Tire Flower Beds: A Comprehensive Guide to Upcycled Garden Design
In the realm of sustainable gardening, repurposing old tires into flower beds stands out as an innovative and eco-friendly approach. Not only does this method reduce environmental waste, but it also adds a unique aesthetic to suburban gardens. This guide delves deep into creating tire flower beds, offering step-by-step instructions, design inspirations, and maintenance tips.
Why Opt for Tire Flower Beds?
1. Eco-Friendly Gardening
Discarded tires pose significant environmental challenges due to their non-biodegradable nature. By transforming them into flower beds, gardeners contribute to waste reduction and promote recycling.
2. Cost-Effective and Durable
Tires are often available for free or at a very low cost from local auto shops. Their inherent durability makes them perfect for long-lasting planters that can withstand the elements.
3. Creative and Customizable
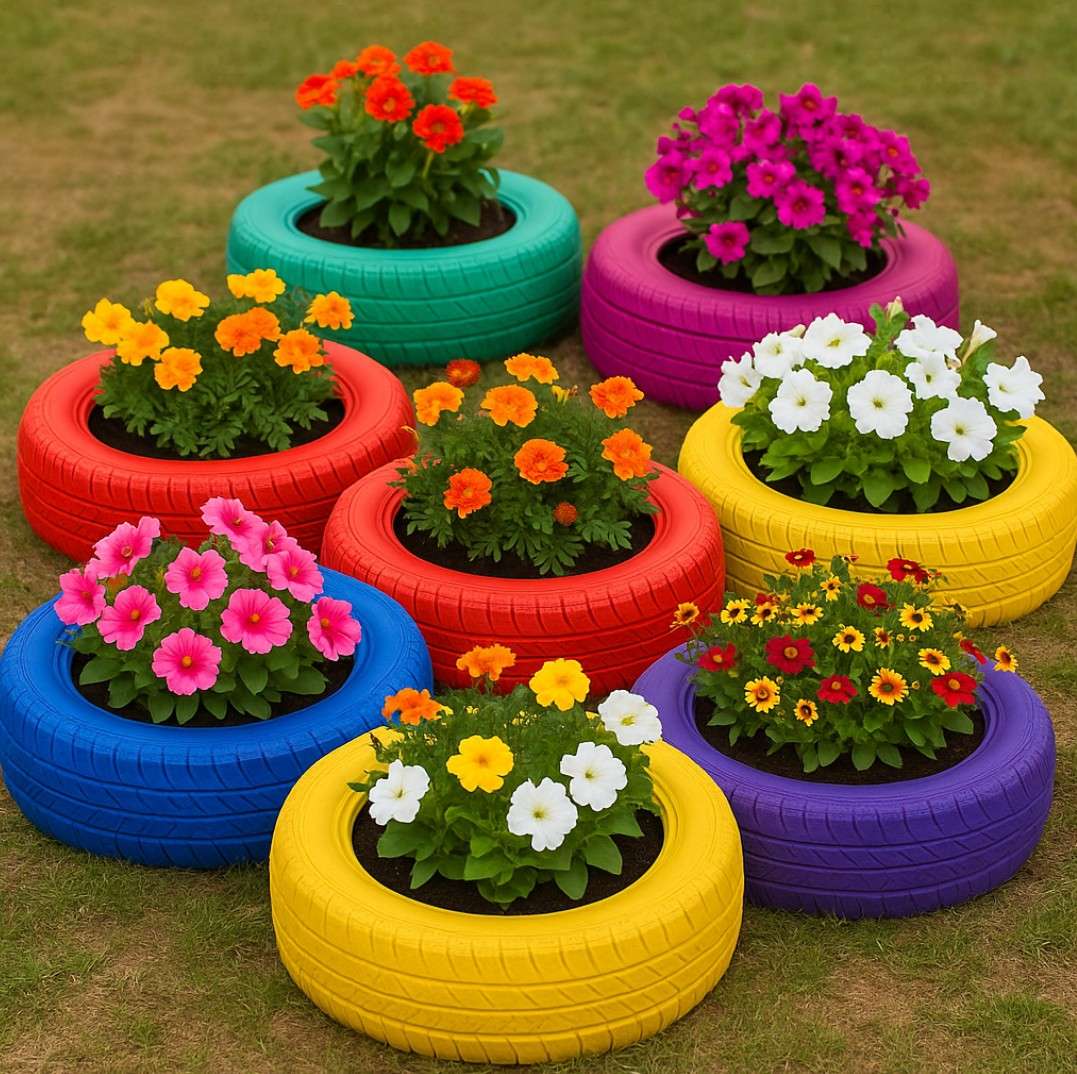
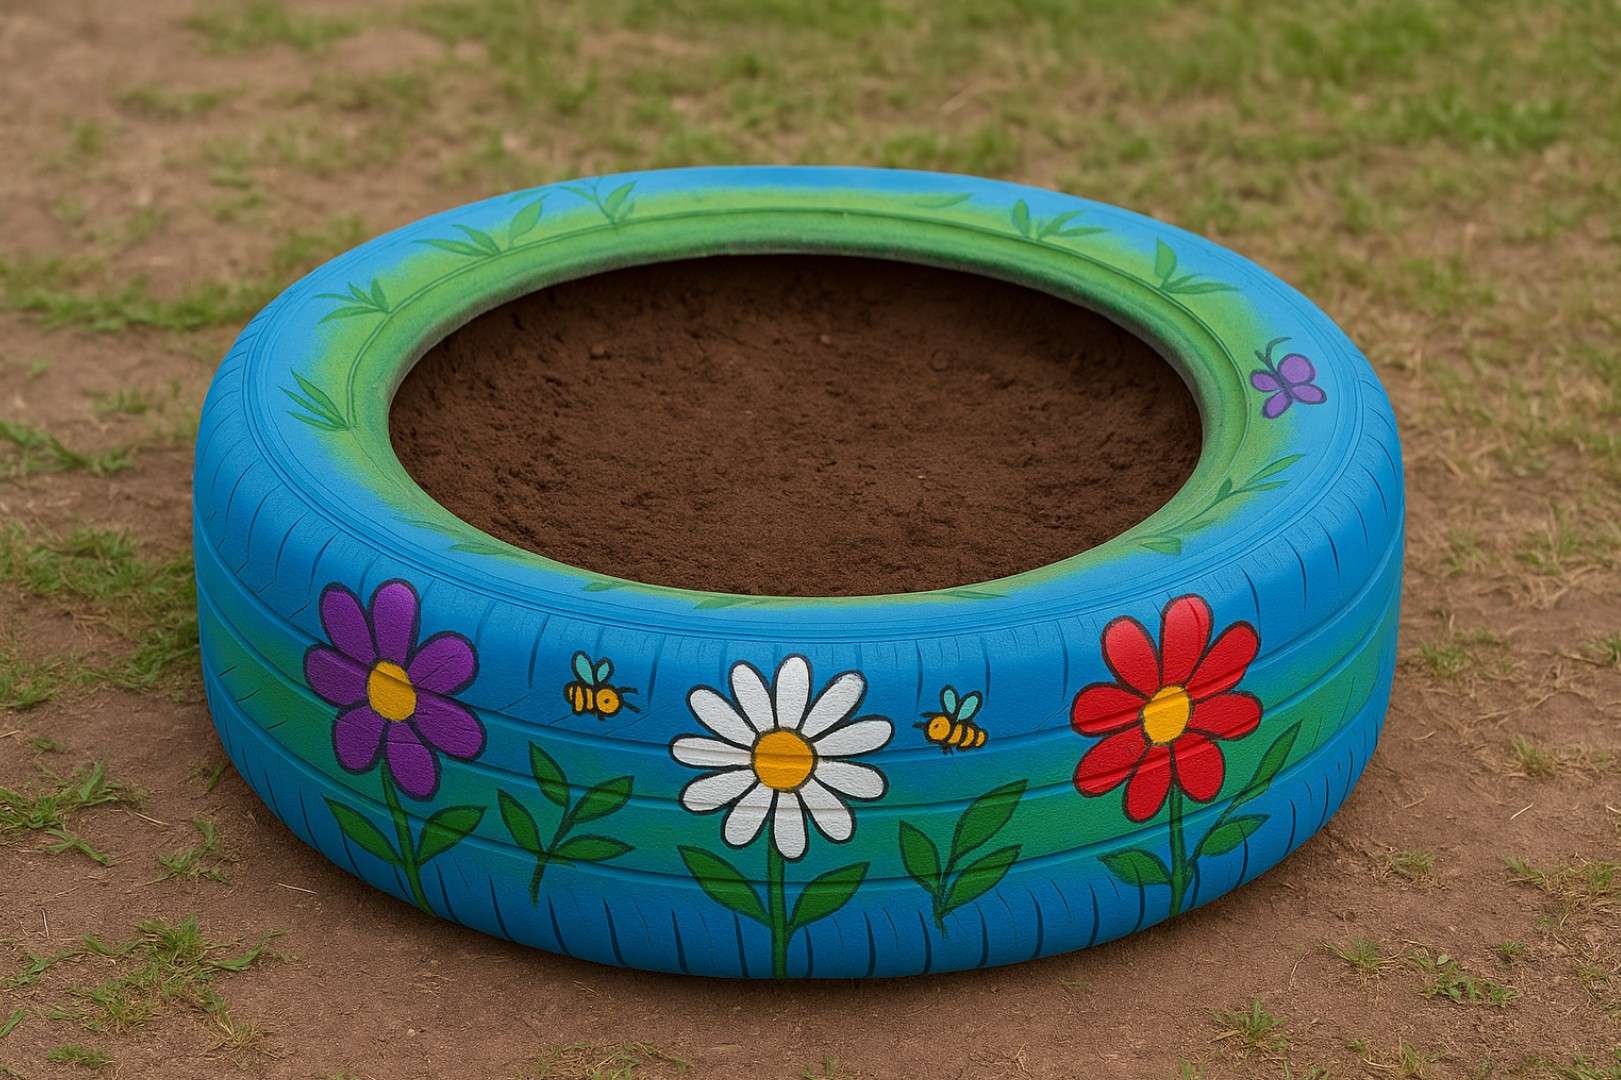
Paint them, stack them, cut them into decorative shapes—tire flower beds are an open canvas for your creativity. They can be matched to any garden theme or seasonal décor.
Materials and Tools You’ll Need
- Used tires (car, truck, or tractor)
- Drill with bits
- Jigsaw or utility knife (for shaping)
- Outdoor-grade spray paint or latex paint
- Landscape fabric (optional)
- Potting soil and compost
- Flowers or plants of choice
- Protective gloves and eyewear
Step-by-Step Instructions
Step 1: Find and Clean Your Tires
The first step is sourcing your tires. Reach out to local tire shops, auto repair centers, or junkyards—many of these places are happy to give away old tires for free since disposal often costs them money. You can also check Facebook Marketplace, Craigslist, or community recycling days for no-cost or low-cost tire pickups.
Once you’ve got your tires, it’s essential to give them a thorough cleaning. Use a stiff brush and soapy water to scrub away any dirt, road grime, or oil residue. Pay special attention to the inside of the tire as well—debris can collect there over time. Rinse them well and let them dry completely before moving on to cutting or painting. Clean tires will not only accept paint better but will also create a healthier environment for your plants.
Step 2: Cut or Shape (Optional)
If you’re aiming for more than just a round planter, shaping your tires can elevate their visual appeal. Use chalk or a marker to draw a scalloped or zigzag pattern around the sidewall of the tire. Make sure the tire is securely clamped or held down, then carefully cut along your lines using a jigsaw or heavy-duty utility knife. This step can be tough—many tires have steel belts inside the rubber, so take your time and wear protective gloves and safety glasses.
After cutting, flip the tire inside out. This may take some muscle, but the result is a charming, flower-like shape that makes the perfect garden centerpiece. If you’re stacking tires, you can cut just the top layer or leave the others whole for stability.
Step 3: Add Drainage Holes
Proper drainage is crucial for healthy plants. Using a power drill with a large bit (around ½ inch), drill several holes in the bottom tread of each tire. Space them a few inches apart to allow water to flow freely and prevent root rot. If you’re placing the tires directly on soil, you can skip this step, but for patios, driveways, or decks, it’s necessary to avoid soggy soil buildup.
If you want extra drainage, consider placing a few small stones or broken terra cotta pieces inside the bottom of the tire before adding soil. This creates a reservoir that keeps roots from sitting in water.
Step 4: Paint Your Tires
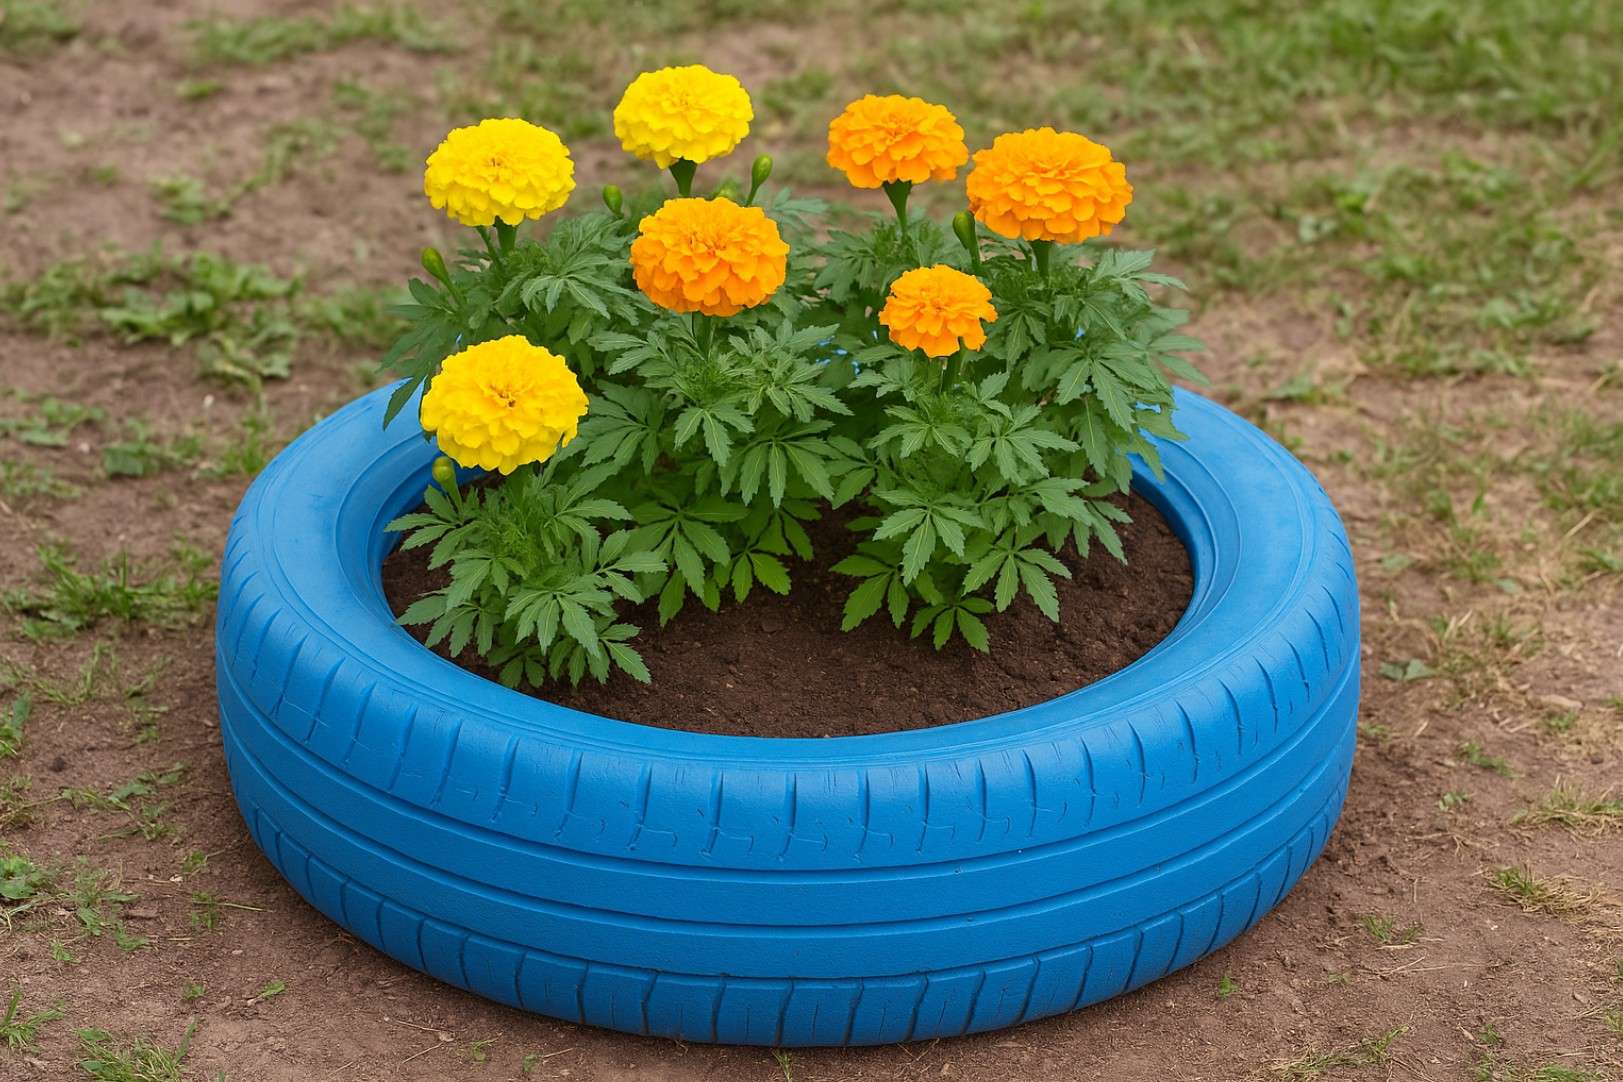
Now comes the fun part—painting! Choose outdoor-safe spray paints or weather-resistant exterior latex paint. Bright colors like turquoise, yellow, or red can bring a cheerful pop to your garden, while earthy greens and browns blend beautifully into a natural landscape. Lay down a drop cloth or cardboard, and apply paint evenly across the outer and inner walls of the tire. Let the first coat dry fully (about 30–60 minutes depending on the paint), then apply a second coat for a vivid, long-lasting finish.
If you want to add designs—like polka dots, vines, or floral motifs—use stencils or hand-paint them once your base color dries. You can even assign each tire a seasonal theme and repaint them throughout the year.
Step 5: Arrange and Fill
Decide where you want to place your tire planters. Choose an area that receives adequate sunlight for your chosen plants—most flowers and herbs need at least 6 hours of direct sun daily. You can arrange tires in a single layer across your garden, stack them vertically for raised beds, or create multi-tiered displays for added dimension.
Once you’ve arranged them, line the bottom of each tire with landscape fabric or a few layers of newspaper to prevent weeds from growing up through the soil. Add a layer of gravel or broken pot shards for drainage, followed by rich potting soil mixed with compost. This ensures that your plants have plenty of nutrients and proper drainage from the start.
Step 6: Plant and Water
Now it’s time to get your hands dirty. Choose plants that are appropriate for your climate and the amount of sunlight your tire beds will receive. Fill each tire with a mix of companion plants for maximum productivity and visual appeal.
Gently dig holes for your seedlings or seeds according to the depth instructions on their packaging. After planting, water thoroughly to help settle the soil and eliminate air pockets around the roots. Keep the soil evenly moist for the first week or two to help your plants establish a strong root system.
Maintenance Tips
- Watering: Check soil regularly to avoid over- or under-watering.
- Seasonal Painting: Refresh paint seasonally to maintain appearance.
- Replenish Soil: Top off soil at the start of each season to keep plants healthy.
Design Ideas
Here are a few ideas to get you inspired:
- Stack tires vertically for a layered flower tower.
- Hang tires on fences for vertical flower beds.
- Paint tires with floral or garden-themed motifs.
External Inspiration
Want to see a tire garden in action? Check out this detailed tutorial from Instructables: Build a Raised Bed Garden From Tires.
Further Reading
- How Rain Gardens Can Solve Stormwater Issues
- Lavender Companion Plants for Pollinator Gardens
- Tomato Companion Planting Tips
Final Thoughts – Tire Flower Beds
Creating tire flower beds is a sustainable, budget-friendly way to breathe life into your garden while keeping old tires out of landfills. With a splash of paint and a bit of creativity, you can turn discarded rubber into vibrant, eye-catching displays that not only improve your yard’s aesthetic but also support a more eco-conscious lifestyle.
Whether you’re a seasoned suburban gardener or just getting started, this DIY project is approachable and endlessly customizable. For more inspiration and gardening how-tos, be sure to explore our full blog archive.
Happy planting!